How-to
Create a Claim from an Encounter
Turn a signed encounter into a draft claim, reading the encounter's note beside the claim form.
Last reviewed November 18, 2026
Create a claim for a finished visit from the encounter’s diagnoses, the patient’s insurance, and the services provided. The encounter’s signed note is shown beside the claim form, so you can code from the note without leaving the screen. A new claim is saved as a draft and goes to the coding review queue.
Before you begin
- You need the Billing, Provider, or Administrator EMR role. Front desk users cannot create claims.
- The encounter’s note must be signed. An unsigned encounter shows Sign the note to bill this visit. in its Billing card.
- The patient needs active insurance on their Patient Profile. Claims for self-pay patients are not available yet, but you can still print a superbill.
- Diagnoses come from the encounter. Add them in the note with
/add-diagnosisor/dxmacro while documenting the encounter. - Charges and service information fill in from your practice’s fee schedule, which an administrator sets up under Admin → Fee schedule and optionally under Admin → Schedule → Visit type Without one, enter each charge by hand.
Open the Create claim screen
Use either option described below.
Option: Sign the note and continue to billing
- In the Document Encounter workspace, finish the note.
- Select Sign & continue to billing.
The note is signed, the encounter is marked finished, and the Create claim screen opens.
Option: From the encounter’s Billing card
- Open the signed encounter.
- In the Billing card, next to No claim yet., select Create claim.
Read the encounter note
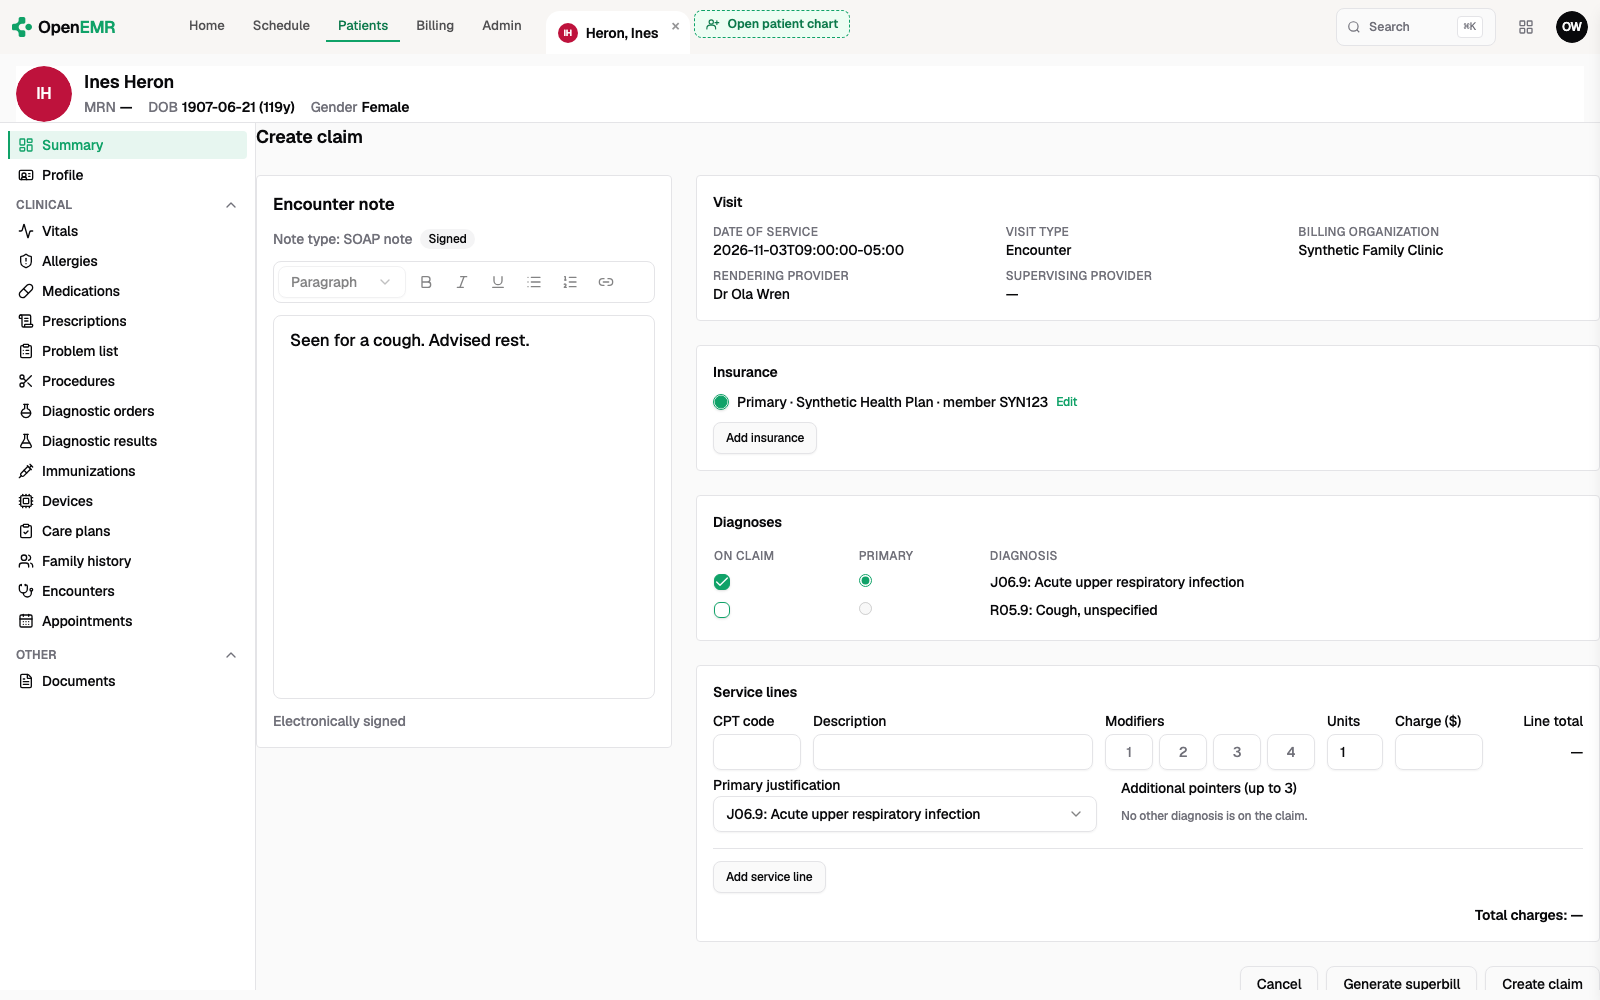
The encounter’s note appears on the Encounter note tab. On a wide screen the tabs sit to the left of the claim form and stay in view while you scroll. On a narrower screen they appear below the form. The Superbill tab beside it shows the visit’s superbill, as described in Print a superbill.
The note is read-only here. A signed note is marked Signed. To change the note, go back to the encounter.
Fill in the claim
- Under Visit, check the Date of service, Visit type, Billing organization, Rendering provider, and Supervising provider. These values come from the encounter. If the billing organization is missing, set it in the encounter’s details.
- Under Insurance, select the insurance to bill. Select Edit to correct a policy, or Add insurance to add one.
- Under Diagnoses, select On claim for each diagnosis to bill, and select the Primary diagnosis. A claim holds up to 12 diagnoses.
- Under Service lines, for each service:
- Enter the CPT or HCPCS code. The Description, Modifiers, Units, and Charge ($) fill in from the fee schedule and visit type configuration. You can override any of the filled-in values. If you change the code, the fields you haven’t edited fill in again for the new code, and anything you typed is kept.
- Enter up to four Modifiers and the Units.
- Select the line’s Primary justification, the diagnosis that supports the service.
- Optionally, select up to three Additional pointers.
- Select Add service line to add another service. Total charges updates as you go.
- Select Create claim.
If you change the visit with Edit encounter details, Create claim and Generate superbill are unavailable until the encounter is read again, so the claim always uses the saved details.
Confirm the result
The message Claim created. It’s in the coding review queue. appears, and you return to the patient’s summary. The encounter’s Billing card now says A claim is in the coding review queue.
To check or change the claim before it is submitted, see Review claims in coding review.
Troubleshooting
| Message | What to do |
|---|---|
| Fix the highlighted entries before creating the claim. | Complete or correct each highlighted field, such as a service line with no code or no primary justification. Nothing is saved until you do. |
| This patient has no active insurance on file. | Add the patient’s insurance on their Profile, or select Add insurance on this screen. |
| No diagnosis is linked to this encounter. Add one in the note (type /dx) first. | Add the diagnosis in the encounter’s note using the diagnosis macro, then return to the claim. |
| The fee schedule couldn’t be loaded, so charges aren’t filled in. Enter them by hand. | Confirm with your administrator that the fee schedule has been configured. Refresh the page. You can also manually enter the service line information. |
| No base fee schedule is set up, so enter each charge by hand. | Enter each charge, and ask an administrator to set up the fee schedule. |
| Your role can’t create claims. | Ask an administrator for a role that can create claims. |
| Couldn’t read the edited encounter, so the claim can’t take its details yet. | Select Read the encounter again. |